Hello Innovators !
Lets build an amazing project today a wifi car.
WiFi Car is a car which can be controlled by your mobile phone.
So let see which components are required for making this Project.
Required Components:
- Node Mcu ( 1 )
- FG Motor Driver ( 1 )
- Power Board ( 1 )
- Geared Motor ( 2 )
- Caster Wheel ( 1 )
- Car Frame ( 1 )
- Switch Screw ( 4 )
- 0 Pin Jumper Wire ( 6 )
- Battery ( 1 )
- Battery Cap ( 1 )
You Can Buy All Components from Here – https://futuregurukuls.in/shop
Connections:
Please follow the diagram for the connection.
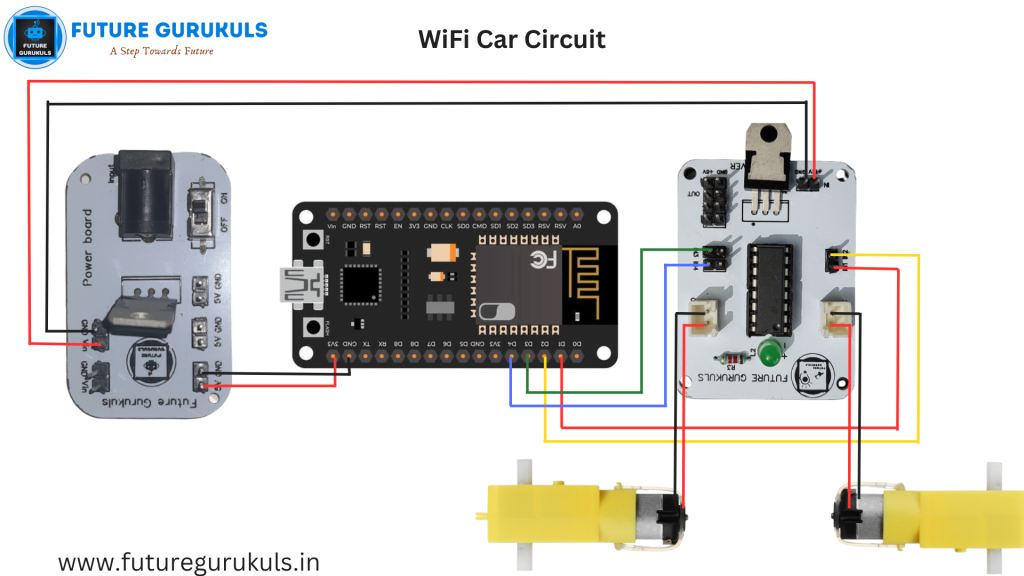
Step 1 – Take Both Motors and connect it in the right port of Motor driver.
Step 2 – Connect D1 Pin of Node Mcu with IN1 Pin of Motor Driver.
Step 3 – Connect D2 Pin of Node Mcu with IN2 Pin of Motor Driver.
Step 4 – Connect D3 Pin of Node Mcu with IN3 Pin of Motor Driver.
Step 5 – Connect D4 Pin of Node Mcu with IN4 Pin of Motor Driver.
Step 6 – Connect 3.3V Pin of Node Mcu with 5V Pin of Power Board.
Step 7 – Connect G Pin of Node Mcu with Gnd Pin of Power Board.
Step 8 – Connect +12V Pin of Motor Driver with Vin Pin of Power Board.
Step 9 – Connect GND Pin of Motor Driver with GND Pin of Power Board.
Now Connect Battery with Power Board.
Coding:
After completing the connection you need to code your Node Mcu according to the Connection.
Code for WiFi Car is Given Below, You can copy the entire Code and paste it in your Arduino IDE and then Upload it in Your Node MCU as per the instructions given to you.
//Future Gurukuls Is Best Platform for Learning Robotics,Coding, IoT etc.
#include <ESP8266WiFi.h>
#include <ESP8266WebServer.h>
#include <ArduinoOTA.h>
// connectionss for drive Motors
int IN1 = D1;
int IN2 = D2;
int IN3 = D3;
int IN4 = D4;
const int buzPin = D5; // set digital pin D5 as buzzer pin (use active buzzer)
String command;
long int cm,duration;
// String to store app command state.
ESP8266WebServer server(80);      // Create a webserver object that listens for HTTP request on port 80
unsigned long previousMillis = 0;
String sta_ssid = "";      // set Wifi networks you want to connect to
String sta_password = "";  // set password for Wifi networks
void setup(){
  Serial.begin(115200);    // set up Serial library at 115200 bps
  Serial.println();
  Serial.println("*WiFi Robot Remote Control Mode*");
  Serial.println("--------------------------------------");
  pinMode(buzPin, OUTPUT);      // sets the buzzer pin as an Output
  //pinMode(ledPin, OUTPUT);      // sets the LED pin as an Output
  digitalWrite(buzPin, LOW);
  //digitalWrite(ledPin, LOW);
  // Set all the motor control pins to outputs
  pinMode(IN1, OUTPUT);
  pinMode(IN2, OUTPUT);
  pinMode(IN3, OUTPUT);
  pinMode(IN4, OUTPUT);
  //pinMode(trigpin,OUTPUT);
  //pinMode(echopin,INPUT);
  // Turn off motors - Initial state
  digitalWrite(IN3, LOW);
  digitalWrite(IN4, LOW);
  digitalWrite(IN1, LOW);
  digitalWrite(IN2, LOW);
  // set NodeMCU Wifi hostname based on chip mac address
  String chip_id = String(ESP.getChipId(), HEX);
  int i = chip_id.length()-4;
  chip_id = chip_id.substring(i);
  chip_id = "wificar-" + chip_id;
  String hostname(chip_id);
  Serial.println();
  Serial.println("Hostname: "+hostname);
  // first, set NodeMCU as STA mode to connect with a Wifi network
  WiFi.mode(WIFI_STA);
  WiFi.begin(sta_ssid.c_str(), sta_password.c_str());
  Serial.println("");
  Serial.print("Connecting to: ");
  Serial.println(sta_ssid);
  Serial.print("Password: ");
  Serial.println(sta_password);
  // try to connect with Wifi network about 10 seconds
  unsigned long currentMillis = millis();
  previousMillis = currentMillis;
  while (WiFi.status() != WL_CONNECTED && currentMillis - previousMillis <= 10000) {
    delay(500);
    Serial.print(".");
    currentMillis = millis();
  }
  // if failed to connect with Wifi network set NodeMCU as AP mode
  if (WiFi.status() == WL_CONNECTED) {
    Serial.println("");
    Serial.println("*WiFi-STA-Mode*");
    Serial.print("IP: ");
    Serial.println(WiFi.localIP());
    //digitalWrite(echoPin, LOW);    // Wifi LED on when connected to Wifi as STA mode
    delay(3000);
  } else {
    WiFi.mode(WIFI_AP);
    WiFi.softAP(hostname.c_str());
    IPAddress myIP = WiFi.softAPIP();
    Serial.println("");
    Serial.println("WiFi failed connected to " + sta_ssid);
    Serial.println("");
    Serial.println("*WiFi-AP-Mode*");
    Serial.print("AP IP address: ");
    Serial.println(myIP);
    //digitalWrite(wifiLedPin, HIGH);   // Wifi LED off when status as AP mode
    delay(3000);
  }
  server.on ( "/", HTTP_handleRoot );       // call the 'handleRoot' function when a client requests URI "/"
  server.onNotFound ( HTTP_handleRoot );    // when a client requests an unknown URI (i.e. something other than "/"), call function "handleNotFound"
  server.begin();                           // actually start the server
  ArduinoOTA.begin();                       // enable to receive update/uploade firmware via Wifi OTA
}
void loop() {
    ArduinoOTA.handle();          // listen for update OTA request from clients
  server.handleClient();        // listen for HTTP requests from clients
      command = server.arg("State");          // check HTPP request, if has arguments "State" then saved the value
      if(command == "F") Forward();
      // check string then call a function or set a value
      else if (command == "B") Backward();
      else if (command == "R") TurnRight();
      else if (command == "L") TurnLeft();
      else if (command == "G") ForwardLeft();
      else if (command == "H") BackwardLeft();
      else if (command == "I") ForwardRight();
      else if (command == "J") BackwardRight();
      else if (command == "S") Stop();
      else if (command == "V") BeepHorn();
}
// function prototypes for HTTP handlers
void HTTP_handleRoot(void){
  server.send ( 200, "text/html", "" );       // Send HTTP status 200 (Ok) and send some text to the browser/client
   if( server.hasArg("State") ){
     Serial.println(server.arg("State"));
  }
}
void handleNotFound(){
  server.send(404, "text/plain", "404: Not found"); // Send HTTP status 404 (Not Found) when there's no handler for the URI in the request
}
// function to move forward
void Forward(){
  digitalWrite(IN3, HIGH);
  digitalWrite(IN4, LOW);
  digitalWrite(IN1, HIGH);
  digitalWrite(IN2, LOW);
}
// function to move backward
void Backward(){
  digitalWrite(IN3, LOW);
  digitalWrite(IN4, HIGH);
  digitalWrite(IN1, LOW);
  digitalWrite(IN2, HIGH);
}
// function to turn right
void TurnRight(){
  digitalWrite(IN3, LOW);
  digitalWrite(IN4, HIGH);
  digitalWrite(IN1, HIGH);
  digitalWrite(IN2, LOW);
}
// function to turn left
void TurnLeft(){
  digitalWrite(IN3, HIGH);
  digitalWrite(IN4, LOW);
  digitalWrite(IN1, LOW);
  digitalWrite(IN2,  HIGH);
}
// function to move forward left
void ForwardLeft(){
  digitalWrite(IN3, HIGH );
  digitalWrite(IN4, LOW);
  digitalWrite(IN1, LOW);
  digitalWrite(IN2, LOW);
}
// function to move backward left
void BackwardLeft(){
  digitalWrite(IN3, LOW);
  digitalWrite(IN4, LOW);
  digitalWrite(IN1, HIGH);
  digitalWrite(IN2, LOW);
}
// function to move forward right
void ForwardRight(){
  digitalWrite(IN3, LOW);
  digitalWrite(IN4, HIGH);
  analogWrite(IN1,  LOW);
  analogWrite(IN2,  HIGH);
}
// function to move backward left
void BackwardRight(){
  digitalWrite(IN3, LOW);
  digitalWrite(IN4, HIGH);
  digitalWrite(IN1,  LOW);
  digitalWrite(IN2,  LOW);
}
// function to stop motors
void Stop(){
  digitalWrite(IN3, LOW);
  digitalWrite(IN4, LOW);
  digitalWrite(IN1, LOW);
  digitalWrite(IN2, LOW);
}
// function to beep a buzzer
void BeepHorn(){
  digitalWrite(buzPin, HIGH);
  delay(150);
  digitalWrite(buzPin, LOW);
  delay(80);
}
After Uloading this Code in your Node Mcu You need to download a App in your Mobile Phone.
Go to Play Store and Search – ESP8266 WiFi Robot Car

Download This App in your Mobile Phone.
Now turn on Your WiFi and search fro New Device.
If Everything will be Okay you will get your Wifi Car Name in wifi list.
Connect it with wifi and Open Your app.
Congratulations ! You are ready to run your car with Mobile Phone.


0 Comments